


How To Create A Unified Beta Distribution Experience For iOS Apps?
by Abdul Aziz Mondal Technology Published on: 27 February 2023 Last Updated on: 27 September 2024
After a development team is done with all their quality checks, they sometimes do what we call an “alpha” test, which is basically a pre-beta test done by experts in the industry.
Whether an alpha is done or not, all developers of sound mind go through a “beta” test.
This article will tell you how you can create a parallel, simultaneous, and unified beta distribution experience for your iOS apps.
What Is A Beta Test?
A beta test, in terms of iOS apps, is those apps being used in a real-world environment by people who are absolutely detached from the development process.
The main purpose of beta testing is to uncover bugs and glitches in the application while it is being used by people who best represent the iOS apps’ intended audience and also to gather data and opinions from the end users about the UI and the UX.
Above, the data from the beta tester about the iOS apps’ UI and UX together represent what we call “total usability”, and have historically proven to be a very good yardstick of where your iOS app stands in the market in terms of how easy/ practical it is to use.
This is why it is imperative that developers choose their beta testers meticulously, trying to get their testers as close as possible to their projected and targeted audience.
For in-house beta testing, the developers usually give the volunteers (or paid testers) devices on which the app is pre-installed, or for a wider unified beta distribution experience, the development team usually makes the app available for download over the internet.
That said, in-house beta testing is becoming less popular, given the rising costs of developing an iOS app. The developers alone run up a pretty hot bill: according to Indeed, iOS developers earn an average of USD 125,663 per year.
Life hack: you can save over 40 percent of your team acquisition cost if you hire iOS developer(s) remotely. Indicative rates of remote iOS developers are USD 1750 to USD 2500 per month.
In addition, you get access to a truly global talent pool that is not hindered by the shackles of geographical boundaries.
What Is A “Unified Beta Distribution Experience” Anyway?
A “beta distribution” is a mathematical table that covers probability distribution variances. Its most common use in app development is to model (or predict) the probability of success (of something), in this case, of an app.
“Success” in the above line is defined as the app working properly, with clean usability, no bugs, glitches, stutters, lags, or other hiccups.
The word “unified” means simultaneous, as different beta testers in your unified beta distribution experience will not receive different versions of your iOS app.
The one possible issue that comes up now is that with unified beta distribution experience models in app testing, you cannot give individual testers device-optimized versions of your app – but in my opinion, this is actually more of a pro than a con because more often than not it ensures that your app will run across a whole host of devices.
Thus, to sum up, a unified beta distribution experience for your iOS app means that your test group will receive the same version of your pre-release app and will all face the same bugs, glitches, and stops if any.
The biggest advantage of a unified beta distribution experience model is that you eliminate the possibility of any bugs or glitches that are found to be version-specific or device-specific.
Launch A Unified Beta Distribution Experience for your iOS Apps
On Android, development teams can simply choose to distribute their app via a simple internet link, and all the users have to do is enable “installation from unknown sources” on their handset, and presto – the possibilities for distribution are now endless.
On iOS, however, it is a slightly lengthier process. Here are the steps to creating a unified beta distribution experience for your iOS apps:
- Registration
- Tester Contact Collection And Upload
- Building The Beta Release Version
- Testers Install The Application
Registration
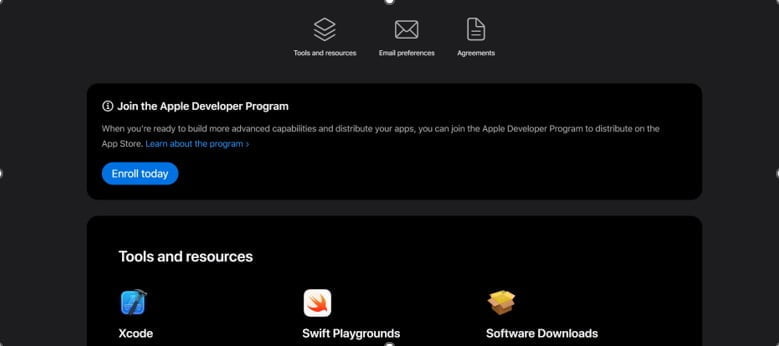
The first step in creating a unified beta distribution experience on iOS is to register yourself as a developer on Apple’s developer site. You can register either as an individual dev or as an organization.
For individuals, you will need your Apple ID and basic identifying information proofs, such as your legal name, legal status, and legal address.
If you choose to register as an organization, you will need your organizational D.U.N.S. ID, which is a nine-digit unique number issued to organizations by Dun and Bradstreet. If you do not have a D.U.N.S. number, you will have to register for one (these are free in most jurisdictions).
Also, if applying as an organization, you will need to have a legal entity presence, as Apple does not enter into contracts with fictional businesses, branches, DBAs, and the like (including trade names).
There is also a stipulation that your organization’s website needs to be publicly available and that the domain must be registered to, or associated with your organization.
Lastly, when applying to an organization, the person applying must have the authority within himself or herself to bind the organization to a contract.
Here is a brief overview of the two different tiers of developer programs offered by Apple, which will allow you to create a unified beta distribution experience on iOS:
| # | Program Name | Cost Per Account | Particulars Of Program |
| 1 | Standard | $99 annually | A maximum of 100 users per account, can submit apps to the app store, user accounts can only be removed from the app store once every membership year. |
| 3 | Enterprise | $299 annually | An unlimited number of users within the organization, cannot submit apps to the app store. |
You can enroll yourself or your organization in both developer programs if required.
Tester Contact Collection
By “contact,” I mean Apple IDs. You need to collect all the apple IDs of the people who will be testing your app.
You will need to gather the emails of every person who will be a beta tester, and then proceed to add these emails to your developer account (whether standard or enterprise).
However, in some situations, you may also need to ask for device UDIDs, which are 40-digit long numbers that uniquely identify each device.
The easiest way to get your non-techy testers to find their UDID is to use a website like WhatsMyUDID.
The next step is to authorize each of the emails in order to be able to download the app, a simple task that your IT department should be able to handle.
Making The Build Available

Once your beta-ready build is made, you will need to upload it using Xcode.
Some people in the recent past have reported issues with the Application Loader, which can be resolved through this discussion on StackOverflow.
For TestFlight, your app will need to pass the full app review (this may take many hours, depending on the size and optimization of your app), and will also need to be cent percent compliant with the App Store Review Guidelines.
Once this is done, you will be able to make your build available through the developer program, and you can now add internal and external testers to your iOS app beta.
Testers Install The Application

When an internal or external tester has been added to your iOS app beta, they will each receive a notification that they have been added to the beta program of “The XYZ” application.
If your testers already have an account, all that will happen now is that they will get an invite to test the app.
If not, they will receive an email with detailed instructions on how to create a free TestFlight account and how to install the app.
That said, sometimes testers still find it hard to follow those instructions, so it may be worthwhile sending them the Apple Guide To Testflight.
Now, as soon as the user hits the install button, the app will give the provisioning profile to the device and will now verify if the device attempting to install the app has the same 40-digit UDID as the UDID in the provisioning package (this pack was created when the email IDs were added to the developer account, and are unique to each device).
If the UDIDs match, the app is installed, and if not, you will have to verify if the UDIDs are correctly entered in your apple developer account management console.
Final Thoughts
With all things said and done, it is more than likely to be a seamless experience of bringing your beta testers on board, because Apple is so focussed on usability and ease.
And that, in essence, was how you can create a unified beta distribution experience for iOS apps.
Everyone who wants their app on the app store will have to do these steps, but performing the steps in this order will ensure that you will not have any of the heartaches that come with not knowing what to do when attempting to make a beta version of your app available.
So, if you didn’t know, now you know.


Related