


How to Export Exchange 2019 Mailboxes to PST using PowerShell?
by Barsha Bhattacharya Blog Published on: 24 February 2026 Last Updated on: 23 March 2026
You may need to export mailboxes from your Exchange Server 2019 to PST format for portability, archiving, and several other reasons. In this article, we will go through the stepwise process to export mailboxes to PST using the PowerShell commands.
We will also be discussing the challenges you might encounter while performing the process and how to overcome them. We will also discuss about third party EDB to PST Converter tool to automate the export process in few simple steps.
Why you need to Export Exchange Mailboxes to PST?
There are many reasons why you would export mailboxes to PST files. Let’s explore some of the common reasons.
- Extracting a mailbox of a leaver as it is not needed on the server, but you need to keep a copy in an archive storage.
- Exporting mailboxes which are not used anymore and to offload the server.
- Merging mailboxes.
- Meeting the compliance and regulations.
- Investigation and forensics.
Process to Export Exchange 2019 Mailboxes to PST using PowerShell
To export mailboxes from the Exchange Server to PST files, there are two native methods – using the Graphical User Interface (GUI) in the Exchange Admin Center (EAC) and using the PowerShell commands in the Exchange Management Shell (EMS). Below, we will see how to export mailboxes to PST using the PowerShell commands.
Step 1: Set up the Network Share
Before exporting the mailboxes from Exchange Server, you need to first setup a network share as you cannot export directly to a folder.
You can export to a share on the same server, another server, or network attached storage. First, create a folder and then follow these steps:
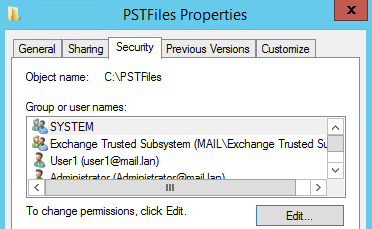
- Right-click on the folder and click on Properties.
- Click on the Sharing tab and click on the Advanced Sharing button.
- Tick the Share this folder option and enter a name for the share.
- Click on the Permissions button.
- Click on the Add button.
- Add the user who will be exporting and the Exchange Trusted Subsystem security group with Full Control rights. Click OK.
Step 2: Assign the Required Permissions
This is an essential part as without the required permissions you will not be able to export any data from your Exchange Server.
Although you would have domain administrator rights, you still need to assign the right permissions on the Exchange Server. To assign the permissions, login to the Exchange Admin Center (EAC) and then follow these steps:
- Click on Permissions.
- Click on Admin Roles.
- Click on the + (add) button to add a new admin role.
- Enter the name for the roles, for example, “Export Role”.
- Find and add the role called Mailbox Import Export and add it to the list.
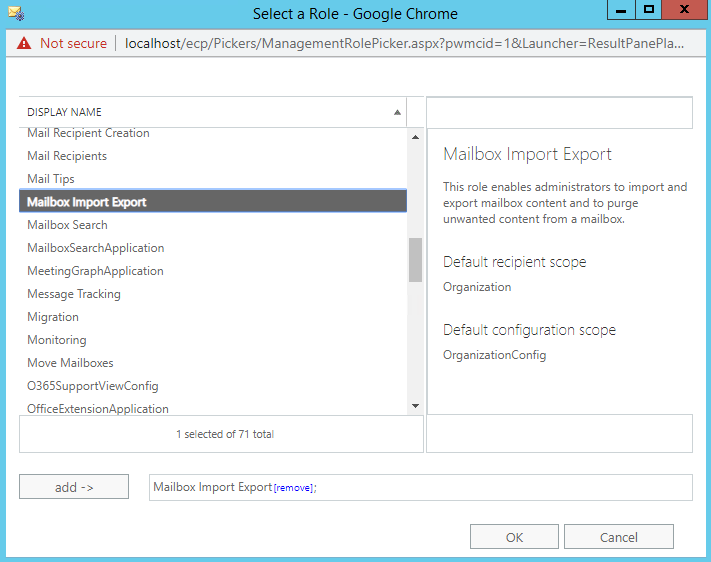
- Add the users which will be allowed to export data from the Exchange Server in the Members area.
- Once done, click on the Save button.
Step 3: Export the Mailboxes to PST using PowerShell
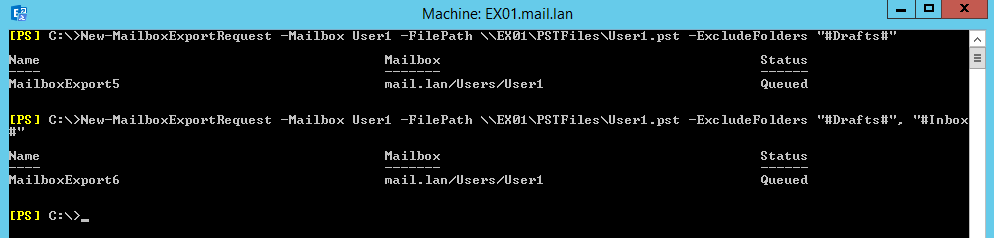
After meeting the above prerequisites, you can now use the New-MailboxExportRequest PowerShell command to export the mailboxes to PST. Below is an example of the command to export an entire mailbox of a user to PST file.
New-MailboxExportRequest -Mailbox <User to Export> -FilePath <\\EX01\PST\ExportFile.pst>

You can alter the command to include or exclude folders from the export (see the below example).
New-MailboxExportRequest -Mailbox User1 -FilePath \\EX01\PST\ExportFile.pst -IncludeFolders “#Inbox#”, “#Sent Items#”

The above command will export only the Inbox and Sent Items folders.
The below command will export all the mailbox data, except the Sent Items folder.
New-MailboxExportRequest -Mailbox User1 -FilePath \\EX01\PST\ExportFile.pst -ExcludeFolders “#Sent Items#”
You can also use the ContentFilter parameter to export items based on dates. The below command, with the Less Than (lt) parameter, will export all the data prior to the mentioned date (01/01/2023).
New-MailboxExportRequest -ContentFilter {(Received -lt ’01/01/2023′)} -Mailbox User1 -Filepath \\EX01\PST\ExportFile.pst
The below command, with the Greater Than (gt) parameter, will export all the emails which are sent post the specified date (01/01/2023).
New-MailboxExportRequest -ContentFilter {(Received -gt ’01/01/2023′)} -Mailbox User1 -Filepath \\EX01\PST\ExportFile.pst
You can also use a mix and match of the above commands and create a script that goes through the list of emails from a CSV file to automate the bulk export.
After running the New-MailboxExportRequest command, you can run the Get-MailboxExportRequest command to monitor the export. It will show the status as In Progress, Completed, or Failed.
An Alternative Solution – Use a Specialized EDB to PST Converter Tool
As you have seen, there are some permissions and scripting skills required to run the above process. This method cannot export purged or deleted items and can only export user mailboxes, shared mailboxes, and user archives.
As an alternative, you can use specialized EDB to PST converter tools, such as Stellar Converter for EDB. With this tool, you can easily connect to Hosted and Offline databases of any Exchange Server version and of any size.
You can easily browse through the data stores and granularly export user mailboxes, user archives, shared mailboxes, and public folders, to PST and other file formats. You can also see a full HTML preview with inline search.
You can also use the tool to export directly to a live Exchange Server database or Office 365 tenant with automatic mailbox matching, parallel exports, and priority exports.
Conclusion
In this article, we have gone through the step-by-step process of exporting mailboxes to PST in Exchange Server 2019 using the PowerShell commands.
We have also talked about a third-party EDB to PST converter tool, named Stellar Converter for EDB. This tool can help reduce manual work, guarantee data integrity, and simplify the export of mailboxes to PST.


Related