

































For many growing companies, the email server in the back office is a hidden cost center. It needs hardware, licenses, electricity, cooling, security patches, and an IT person who knows how to keep it running. Exchange to Microsoft 365 migration replaces that burden with a predictable subscription and a platform that scales as your team grows. This guide covers the financial case for moving from on-premises Exchange Server to Microsoft 365, walks through a real test migration, and shows how to verify the results.
Why Exchange to Microsoft 365 Migration Is a Financial Decision, Not Just a Technical One
Entrepreneurs often treat IT as a technical matter and leave it to someone else. But infrastructure choices show up directly on your balance sheet. An on-premises mail server is a capital expense up front, followed by recurring costs that are easy to underestimate.
The Hidden Costs of On-Premises Exchange Server
When you run your own Exchange Server, you pay for more than the software license:
• Hardware replacement: Servers age, and replacing them every few years is a major capital outlay.
• Maintenance and patching: Security updates require planned downtime and skilled staff.
• Power and cooling: Even a small server room adds to monthly utility bills.
• Backup and disaster recovery: Protecting mailbox data means extra storage, software, and testing.
• Admin time: Hours spent troubleshooting are hours not spent on revenue-generating work.
How Microsoft 365 Changes the Cost Structure
Microsoft 365 converts most of these costs into a per-user monthly fee. You can add or remove users as your headcount changes, so you only pay for what you use. Microsoft handles server maintenance, uptime, and security updates, which lets a small team operate without a dedicated server administrator.
Business Benefits of Moving to the Cloud
Scalability for Growing Companies
Hiring ten people next quarter should not mean buying a new server. With Microsoft 365, new mailboxes are created in minutes. If you downsize or work with seasonal staff, you can reduce licenses just as easily.
Better Support for Remote and Hybrid Teams
Cloud-hosted mailboxes are accessible from any device with an internet connection. Your team can work from home, a client site, or a coworking space without VPN complications or a dependency on the office network.
Stronger Business Continuity
Email is where invoices, contracts, and customer conversations live. If your on-site server fails, work can stop. Cloud infrastructure is built with redundancy, which reduces the risk of losing access to critical communication and the revenue that depends on it.
Planning Your Exchange Server to Microsoft 365 Migration
A successful move starts with planning. Rushing into migration can mean lost emails, broken calendars, or unhappy employees. Before you begin, work through these steps:
1. Take inventory: List the mailboxes, their sizes, and any shared mailboxes or public folders.
2. Clean up data: Remove outdated emails and unused accounts to reduce migration time.
3. Choose a migration method: Manual methods work for very small environments, but a dedicated tool saves time and reduces risk as mailbox counts and data sizes grow.
4. Prepare Microsoft 365: Set up your tenant, licenses, and destination mailboxes.
5. Test first: Always run a pilot migration with a single mailbox before moving everyone.
That last step is where a dedicated migration utility earns its keep.
Choosing the Right Migration Approach- Stellar Migrator for Exchange
Native Microsoft migration options can be complex, particularly for small businesses without in-house Exchange expertise. They often involve multiple configuration stages and hybrid setups that are difficult to troubleshoot. This is where Stellar Migrator for Exchange come into place. This Exchange migration tool simplifies this by guiding administrators through connecting the source and destination environments and mapping mailboxes, instead of requiring command-line work and manual scripting.
When comparing tools, look for:
• Support for on-premises Exchange as the source and Microsoft 365 as the destination
• Mailbox-to-mailbox mapping so data lands in the right account
• Migration of mailbox items such as emails, calendars, and contacts
• A clear workflow that non-specialists can follow
• Options for verifying results after the move
A Real-World Migration Walkthrough: Exchange Server to Microsoft 365
To show what a pilot migration looks like in practice, this test scenario moves a single mailbox from an on-premises Exchange environment to a Microsoft 365 tenant. Before starting, review the user manual and product screenshots so the complete workflow is clear. Migrating just one mailbox keeps the test controlled and the verification simple.
Steps to use Stellar Migrator for Exchange
Download and install Stellar Migrator for Exchange on your system from their official product page.
- Fill Out the Registration Form
Visit the Stellar Migrator for Exchange registration page and fill out the required details in the registration form. - Validate Your Email Address
Check your registered email address for the verification link or code and complete the email validation process. - Download and Install the Software
Once registered, download Stellar Migrator for Exchange and install it on your system by following the on-screen instructions. - Log In and Start the Migration
Launch the software and enter your registered login credentials to sign in. Once logged in, configure the source Exchange Server and destination Microsoft 365 environment to begin the migration process.
Step 1: Define the Source and Destination
• Source environment: On-premises Exchange Server
• Destination environment: Microsoft 365
Only the source mailbox listed above is used for the migration test.
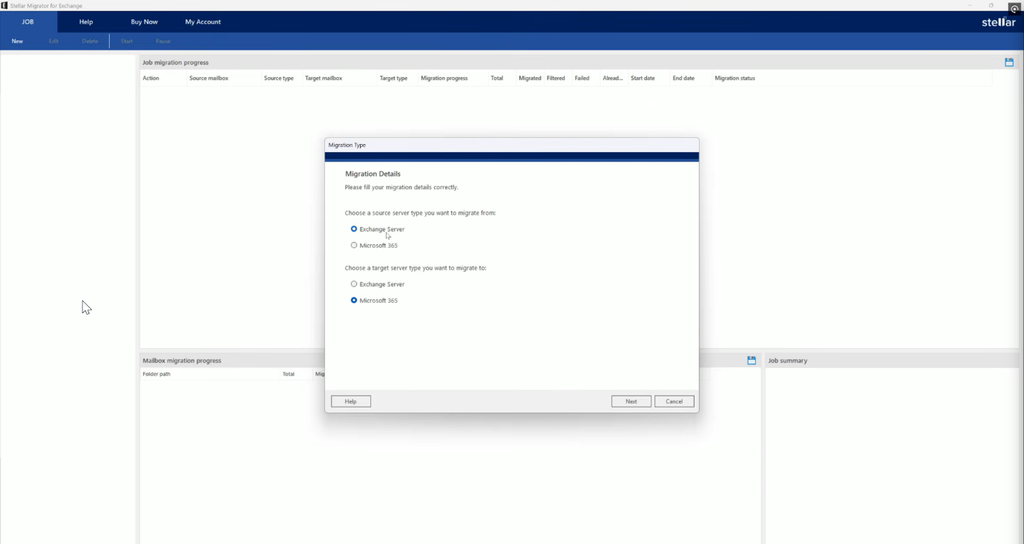
Step 2: Connect to the Source Exchange Server
The migration begins by connecting to the on-premises Exchange environment with an administrator account. The admin account needs sufficient permissions to access the mailboxes being migrated.
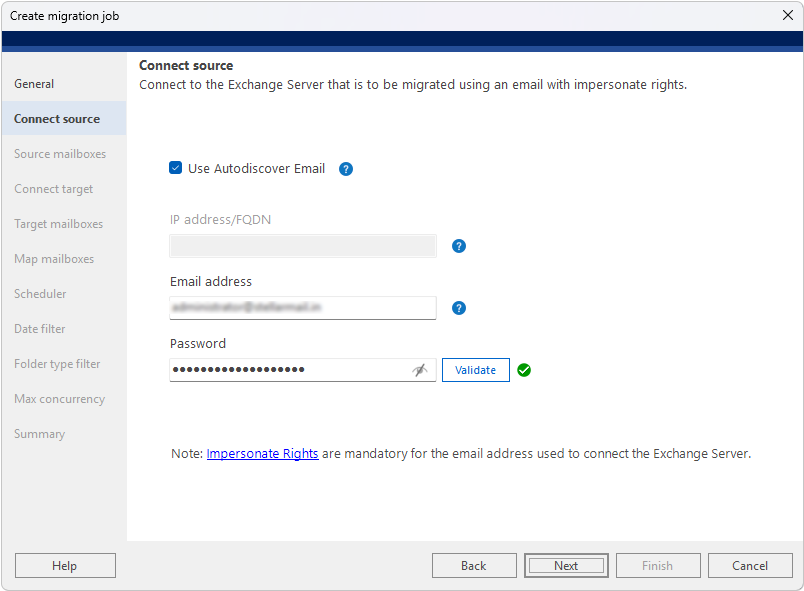
Step 3: Connect to Microsoft 365 Using Manual Authentication
For the destination, the tool connects to Microsoft 365 through manual authentication, which relies on an Azure-registered application. The details used in this test are:
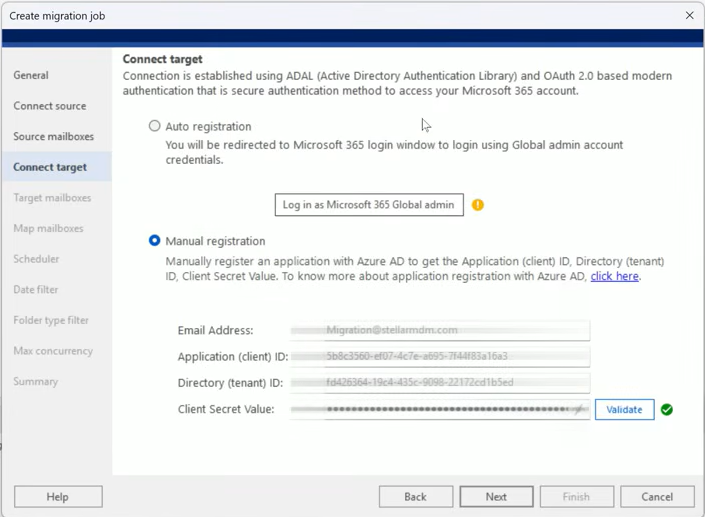
Step 4: Map the Source Mailbox to the Destination Mailbox
Mailbox mapping tells the software which source mailbox should be copied into which Microsoft 365 mailbox. In this test, Jose@stellarmdm.com is mapped to Alice@stellarmdm.com. Accurate mapping matters, because a mismatch can place data in the wrong account.
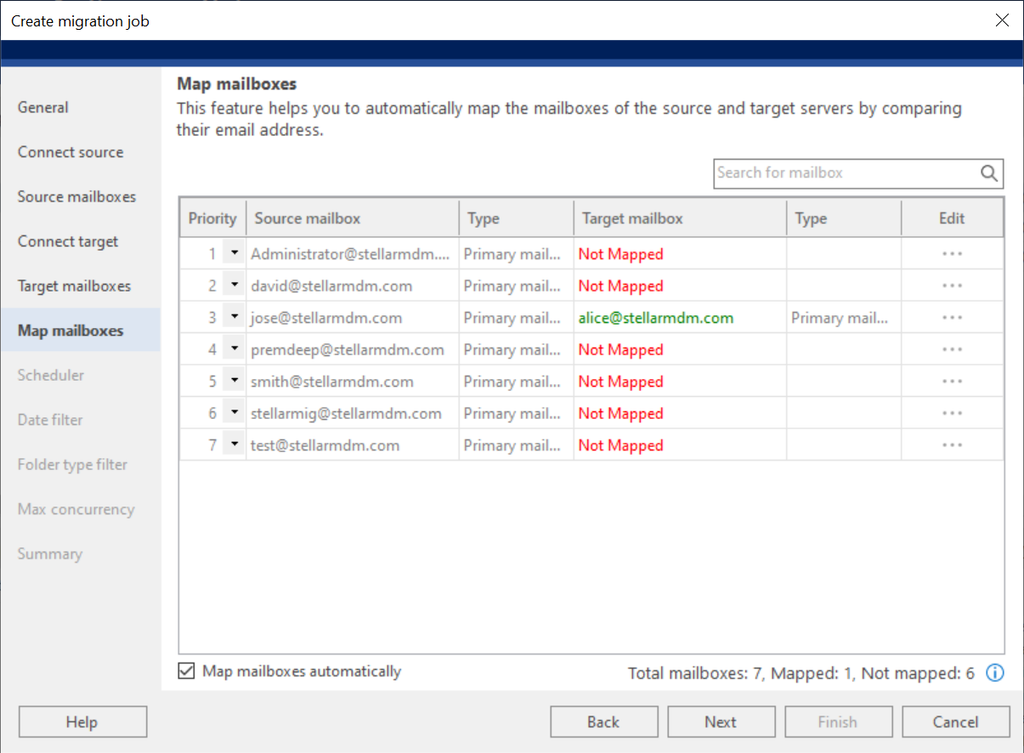
Step 5: Run the Migration
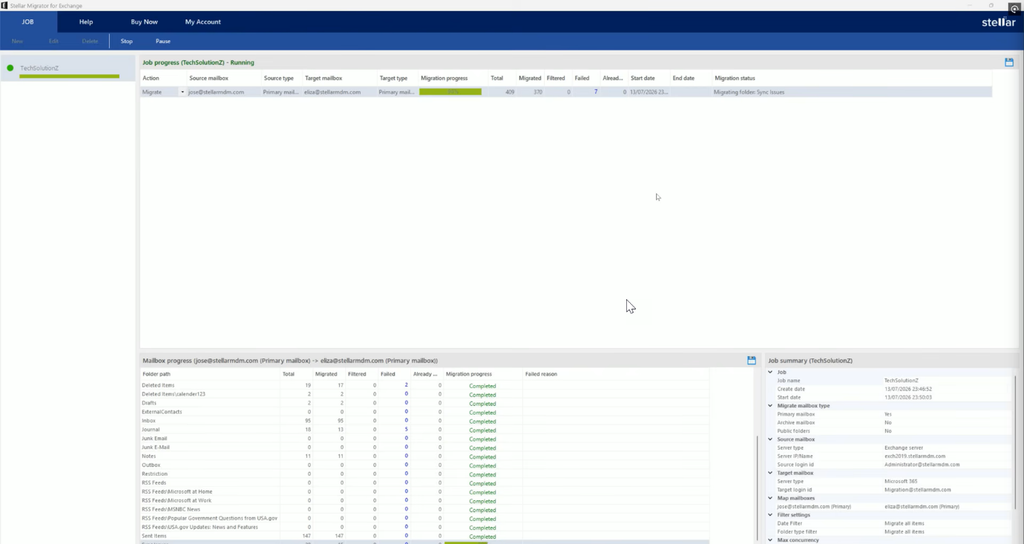
With the connections and mapping confirmed, the migration is started and monitored. The tool shows progress while the mailbox items are transferred. For a single test mailbox this stage is usually quick, though real-world duration depends on mailbox size and network conditions.
Where Specialized Software Fits In
Stellar Migrator for Exchange is designed for this type of project. It supports migration from Exchange Server to Microsoft 365 and walks administrators through each stage of the process. For small businesses, a guided workflow lowers the barrier to doing the migration in-house, which can reduce the consulting fees that often accompany cloud projects.
Whichever tool you select, read the user manual and review the product’s screenshots before you begin. Understanding the workflow in advance helps you anticipate prompts, prepare credentials, and avoid delays on migration day.
Verifying the Migrated Data
Migration is not finished until you have verified the results. After the transfer completes, sign in to Outlook on the web at outlook.office365.com/mail with the destination account:
Then check the following:
• Folder structure: Do the Inbox, Sent Items, and custom folders match the source?
• Email content: Open several messages, including ones with attachments, to confirm they are intact.
• Calendar and contacts: Check that appointments and contact records transferred correctly.
• Item counts: Compare the number of items in key folders against the source mailbox.
• Dates and senders: Confirm that message metadata was preserved.
If everything matches, you can proceed to larger batches with confidence. If something is missing, the pilot has done its job by surfacing the issue before it affects your whole team.
Best Practices for a Smooth Cloud Migration
• Communicate with your team about timing and any changes they will notice, such as a new sign-in process.
• Schedule migrations outside peak hours to minimize disruption.
• Migrate in batches rather than moving every mailbox at once.
• Keep the source mailboxes until you are fully satisfied with the results.
• Secure your credentials and rotate secrets and passwords once the project ends.
• Document the process so future staff can repeat or audit it.
Final Thoughts
Based on hands-on testing, Stellar Migrator for Exchange offers a practical, well-structured approach to migrating mailboxes from Exchange Server to Microsoft 365. What stands out is its guided workflow, automatic mailbox mapping, and ability to manage migration jobs through parallel processing, incremental migration, and real-time progress monitoring.
These capabilities help reduce the manual work involved in traditional migration methods while giving IT administrators greater visibility and control. For businesses looking to simplify their move to Microsoft 365, Stellar Migrator for Exchange is a worthwhile option to evaluate, with a free trial for two mailboxes allowing teams to test the workflow before committing to a larger migration.